 |  |
很重要--转载声明
- 如要转载,请原文转载,如在转载时修改本文,请事先告知,谢绝在转载时通过修改本文达到有利于转载者的目的。
- 原文地址:https://www.cnblogs.com/swarmbees/p/6081823.html
学习qt已有2年多的时间,从qt4.7开始使用直到现在正在使用的qt5.6,基本都在windows机器上做开发。最近有意向看了下qt的qml部分,觉着还是挺不错的,毕竟可以做嵌入式移动端产品的部分,还是值的一学。后来在网上看了一些资料,算是初步了解了下qml,所以想就自己学习的过程做以记录,也方便自己理解,如果你有机会看到这篇文章,那么我认为你也是来学习qml的,如果你已经是一个有很强qml开发经验的老手,那么这篇文章和接下来的qml学习系列的文章你都不用看下去了,呵呵。。。
关于qml的由来,个人觉着Qt的Script、Quick、QML的关系与总结讲的不错,有兴趣的同学可以去看下。
qml的学习过程我主要是以Qt 学习之路 2博客和QmlBook-In-Chinese这本书为主,同时在做小示例的时候查阅帮助文档。每个人的学习方式都不太一样,如果你有更好的办法可以留言。
如下有4张效果图,分别是4个小示例,关于demo后续章节会有解说,但是都是以代码中的注解为主,有兴趣的同学也可以直接下载示例程序,使用qt提供的qmlscene.exe来直接执行qml文件,或者qmlviewer.exe也可以预览qml文件。
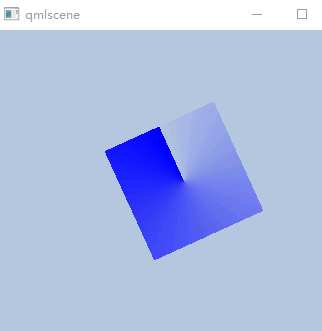
图1 转动的组件

图2 红绿灯1
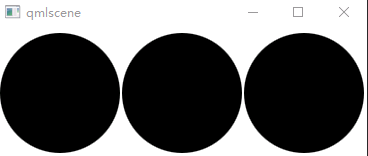
图3 红绿灯2

图4 GridView使用
1、基本元素
QML 基本元素可以分为可视元素和不可视元素两类。可视元素:Item、Rectangle、Text、Image;不可见元素:MouseArea。关于MouseArea是不可见元素这一点我需要强调一下,因为上边我提到的两篇学习文章都没有说清楚,图5是qt5.7的帮助文档截图,从图中我们一眼就能看出结果,MouseArea确实是不可见元素。

图5 MouseArea帮助文档
关于基本元素我觉着qmlbook这本书相关章节的最后一段说的很有意思,特此说明,如图6所示

图6 qml显示和交互分开
理解这些基本元素,你可以认为他们是一个个被封装好的类,而且他们有非常之多的属性,这里我就不介绍了,因为帮助文档说的太清楚了。
2、组件
组件其实就是基本元素的复合,放到一个单独的文件,方便我们以后重用,关于怎么创建组件,本节的后续我会给出自己做的示例程序,代码很简单只是为了说明问题
3、定位器
定位器主要有 Row、Column、Grid和Flow等。
4、元素布局
除了定位器,我们还可以使用锚(anchor)来布局元素
5、输入元素
键盘输入的两个元素:TextInput和TextEdit。TextInput为一行输入,TextEdit为多行输入
6、quick组件
如表1是Qt Quick Controls 1.1 提供的组件
| ApplicationWindow | 对应QMainWindow,提供顶层应用程序窗口 |
| MenuBar | 对应QMenuBar,提供窗口顶部横向的菜单栏 |
| StatusBar | 对应QStatusBar,提供状态栏 |
| ToolBar | 对应QToolBar,提供工具栏,可以添加ToolButton和其它组件 |
| Action | 对应QAction,提供能够绑定到导航和视图的抽象的用户界面动作 |
| 导航和视图 | |
| 方便用户在一个布局中管理和显示其它组件 | |
| ScrollView | 对应QScrollView,提供滚动视图 |
| SplitView | 对应QSplitter,提供可拖动的分割视图布局 |
| StackView | 对应QStackedWidget,提供基于栈的层叠布局 |
| TabView | 对应QTabWidget,提供带有标签的基于栈的层叠布局 |
| TableView | 对应QTableWidget,提供带有滚动条、样式和表头的表格 |
| 控件 | |
| 控件用于表现或接受用户输入 | |
| BusyIndicator | 提供忙等示意组件 |
| Button | 对应QPushButton,提供按钮组件 |
| CheckBox | 对应QCheckBox,提供复选框 |
| ComboBox | 对应QComboBox,提供下拉框 |
| GroupBox | 对应QGroupBox,提供带有标题、边框的容器 |
| Label | 对应QLabel,提供标签组件 |
| ProgressBar | 对应QProgressBar,提供进度条组件 |
| RadioButton | 对应QRadioButton,提供单选按钮 |
| Slider | 对应QSlider,提供滑动组件 |
| SpinBox | 对应QSpinBox,提供微调组件 |
| Switch | 提供类似单选按钮的开关组件 |
| TextArea | 对应QTextEdit,提供能够显示多行文本的富文本编辑框 |
| TextField | 对应QTextLine,提供显示单行文本的纯文本编辑框 |
| ToolButton | 对应QToolButton,提供在工具栏上显示的工具按钮 |
| ExclusiveGroup | 提供互斥 |
| 菜单 | |
| 用于构建菜单的组件 | |
| Menu | 对应QMenu,提供菜单、子菜单、弹出菜单等 |
| MenuSeparator | 提供菜单分隔符 |
| MenuItem | 提供添加到菜单栏或菜单的菜单项 |
| StatusBar | 对应QStatusBar,提供状态栏 |
| ToolBar | 对应QToolBar,提供工具栏,可以添加ToolButton和其它组件 |
表1 Qt Quick Controls 1.1组件
7、模型和视图
模型和视图其实属于qml的高级使用部分了,但是为了能早些理解qml的东西,我提前拿出一些简单的东西,预先学习下。
8、canvas画布
在早些qt4时代,qml只提供了几种基础元素,第一小节也说明了,有很多人期望的圆角矩形,椭圆和圆,但是最终官方没有给出具体的元素,如果是要做这些组件,那么就需要设计师给切图。到了qt5,官方提供了canvas画布,这个画布可以实现复杂的绘图操作,并且画布元素是基于HTML5的画布元素来完成的。支持画笔,填充,渐变,文本和绘制路径创建命令。
接下里就是第二节所展示的效果图对于代码讲解了,那我也就按照上图展示的顺序一个个讲解代码
1、基础组件讲解
在开始示例讲解之前,我先说下我自己封装的一个小组件,代码量很少,只为说明问题,具体请看diamante
 1 import QtQuick 2.5
 2
 3 // 圆角矩形框矩形框,支持点击
 4 Rectangle {
 5     property alias text: name.text;//导出文本变量
 6     property alias textColor: name.color;//导出文本颜色
 7
 8     id: root;
 9     width: 120;
10     height: 120;
11     radius:60;
12     antialiasing: true;
13     signal clicked();//自定义信号  外部可以通过onClicked接收
14
15     MouseArea
16     {
17         width: root.width;
18         height: root.height;
19
20         onClicked:
21         {
22             //鼠标点击时发送消息 并输入日志
23            root.clicked();
24             console.log("rectangle clicked");
25         }
26     }
27
28     Text
29     {
30         id: name;
31         text: "";
32         color: "black";
33         anchors.centerIn: parent;
34     }
35 }
2、旋转的风车,代码里有多种方式实现矩形旋转,具体使用那一种就由个人喜好了
import QtQuick 2.0
import QtQuick.Window 2.0
import QtGraphicalEffects 1.0

import "../contrl" //导入自定义组件模块

Window {
    id:root;
    visible: true;
    width: 600;
    height: 400;

    //背景色窗口
    Rectangle {
        id: bg;
        color:"lightsteelblue";
        width: root.width;
        height:root.height;
    }
    //鼠标点击背景色时停止旋转图形
    MouseArea {
        width: bg.width;
        height: bg.height;

        onClicked: {
            ro.pause();
        }
    }

    //自定义控件  通过import导入
    Rect
    {
        id: roundItem;
        anchors.centerIn: parent;
        //渐变填充矩形
        ConicalGradient
        {
            anchors.fill: parent
            gradient: Gradient {
                GradientStop { position: 0.0; color: "lightsteelblue" }
                GradientStop { position: 1.0; color: "blue" }
            }
        }
        //旋转动画1  程序刚启动会执行 原因未知
        //        NumberAnimation on rotation {
        //            loops:Animation.Infinite;
        //            from:0;
        //            to:360;
        //            duration: 1000;
        //        }


        //旋转动画2  配合wheel.rotation = 360;使用  动画 不能循环执行
        //        Behavior on rotation {
        //            NumberAnimation {
        //                loops:Animation.Infinite;//无效
        //                duration: 1000;
        //            }
        //        }

        //旋转动画3  相比于动画1  在属性中主动指明了target和property
        //        NumberAnimation {
        //            id:ro;
        //            loops:Animation.Infinite;
        //            property: "rotation";
        //            target:roundItem;
        //            from:0;
        //            to:360;
        //            duration: 1000;
        //        }

        //旋转动画4  和动画1是一样的  因为RotationAnimation和NumberAnimation都是继承自PropertyAcimation
        //因此RotationAnimation动画可以实现和动画2一样的效果,使用RotationAnimation
        //        RotationAnimation on rotation {
        //            loops: Animation.Infinite;
        //            from: 0;
        //            to: 360;
        //            duration: 1000;
        //        }

        //旋转动画5
        RotationAnimation {
            id:ro;
            target:roundItem;
            loops: Animation.Infinite;
            from: 0;
            to: 360;
            duration: 1000;
        }

        onClicked: {
            if (ro.paused)
            {
                ro.resume();
            }
            else
            {
                ro.start();
            }
        }
    }
}

3、红绿灯,下述代码红色的的切换时通过鼠标单击进行
  1 import QtQuick 2.0
  2 import QtQuick.Window 2.0
  3 import QtGraphicalEffects 1.0
  4
  5 import "../contrl"
  6
  7 Window
  8 {
  9     function dosomething()//测试script脚本运行效果
 10     {
 11         console.log("do something");
 12     }
 13
 14     id:root;
 15     visible: true;
 16     width: 370;
 17     height: 130;
 18
 19     Rectangle
 20     {
 22         id:rootRect;
 23         width: root.width;
 24         height:root.height;
 25         anchors.centerIn:parent;
 26
 27         Row
 28         {
 29             id:ligheGroup;
 30             spacing: 2;
 31             states:
 32             [
 33                 State {
 34                     name: "red"
 35                //     StateChangeScript {name: "myScript"; script: dosomething(); }  //可以正常调用
 36                     PropertyChanges {
 37                         target: redLight; color:"red";
 38                     }
 39                     PropertyChanges {
 40                         target: greenLight; color:"black";
 41                     }
 42                     PropertyChanges {
 43                         target: yellowLight; color:"black";
 44                     }
 45                 },
 46                 State {
 47                     name: "green"
 48                     PropertyChanges {
 49                         target: redLight; color:"black";
 50                     }
 51                     PropertyChanges {
 52                         target: greenLight; color:"green";
 53                     }
 54                     PropertyChanges {
 55                         target: yellowLight; color:"black";
 56                     }
 57                 },
 58                 State {
 59                     name: "yellow"
 60                     PropertyChanges {
 61                         target: redLight; color:"black";
 62                     }
 63                     PropertyChanges {
 64                         target: greenLight; color:"black";
 65                     }
 66                     PropertyChanges {
 67                         target: yellowLight; color:"yellow";
 68                     }
 69                 }
 70             ]
 71
 72             anchors.centerIn:parent;
 73             Rect//红灯
 74             {
 75                 id:redLight;
 76                 color:"black";
 77                 radius: width/2;
 78             }
 79             Rect//绿灯
 80             {
 81                 id:greenLight;
 82                 color:"black";
 83                 radius: width/2;
 84             }
 85             Rect//黄灯
 86             {
 87                 id:yellowLight;
 88                 color:"black";
 89                 radius: width/2;
 90             }
 91
 92             transitions:
 93             [
 94                 Transition //提供从red状态到yellow状态的渐变过程
 95                 {
 96                     from: "red"
 97                     to: "yellow"
 98               //      ScriptAction { script: dosomething(); }  //可以正常调用
 99                     ColorAnimation{ target: redLight; properties: "color";duration: 1000;}
100                     ColorAnimation{ target: yellowLight; properties: "color";duration: 1000;}
101                 }
102             ]
103         }
104         property bool m_bIsRed : false;
105         MouseArea
106         {
107             anchors.fill: parent;
108             onClicked://鼠标点击时,状态切换
109             {
110                 if (ligheGroup.state == "red"
111                         || ligheGroup.state == "green")
112                 {
113                     ligheGroup.state = "yellow";
114                 }
115                 else
116                 {
117                     if (parent.m_bIsRed == false)
118                     {
119                         ligheGroup.state = "red";
120                         parent.m_bIsRed = true;
121                     }
122                     else
123                     {
124                         ligheGroup.state = "green";
125                         parent.m_bIsRed = false;
126                     }
127                 }
128             }
129         }
130     }
131 }
4、红绿灯,不同于上述红绿灯,次红绿灯只需要鼠标单击触发运行,状态是由定时器来控制,红灯运行60秒,绿灯20秒,黄灯3秒,为了程序的迅速反应,在红灯和绿灯的时候定时器触发频率所有提高,具体请看代码,此处我只贴出定时器部分,如果需要整个运行程序,可自行下载demo。
 1 property bool m_bIsRed : false;//是否是红灯亮
 2     property int m_iTicker : 0;
 3
 4     Timer
 5     {
 6         id:redState;
 7         interval: 50;//每隔50毫秒触发一次,真实情况下本应该是1000毫秒一次
 8         repeat: true;
 9         triggeredOnStart: true;
10         property int count : 60;//红灯秒数
11
12         onTriggered: {
13             if (lightGroup.state != "red")
14             {
15                 lightGroup.state = "red";
16                 root.m_bIsRed = true;
17             }
18
19             ++m_iTicker;
20             redLight.text = count - m_iTicker;
21             if (count <= m_iTicker)//到达指定时间 重置计数器,并切换到黄灯定时器,关闭自身定时器
22             {
23                 m_iTicker = 0;
24                 yellowState.start();
25                 redState.stop();
26             }
27         }
28     }
29     Timer
30     {
31         id:yellowState;
32         interval: 1000;
33         repeat: true;
34         triggeredOnStart: true;
35         property int count : 3;//黄灯秒数
36
37         onTriggered: {
38             if (lightGroup.state != "yellow")
39             {
40                 lightGroup.state = "yellow";
41             }
42             ++m_iTicker;
43             yellowLight.text = count - m_iTicker;
44             if (count <= m_iTicker)//到达指定时间 重置计数器,并切换到绿灯/红灯定时器,关闭自身定时器
45             {
46                 m_iTicker = 0;
47                 if (m_bIsRed)
48                 {
49                     greenState.start();
50                 }
51                 else
52                 {
53                     redState.start();
54                 }
55                 stop();
56             }
57         }
58     }
59     Timer
60     {
61         id: greenState;
62         interval: 150;//每隔150毫秒触发一次,真实情况下本应该是1000毫秒一次
63         repeat: true;
64         triggeredOnStart: true;
65         property int count : 20;//绿灯秒数
66
67         onTriggered: {
68             if (lightGroup.state != "green")
69             {
70                 lightGroup.state = "green";
71                 root.m_bIsRed = false;
72             }
73
74             ++m_iTicker;
75             greenLight.text = count - m_iTicker;
76             if (count <= m_iTicker)//到达指定时间 重置计数器,并切换到黄灯定时器,关闭自身定时器
77             {
78                 m_iTicker = 0;
79                 yellowState.start();
80                 greenState.stop();
81             }
82         }
83     }
5、日历窗口,代码量不大,有兴趣的可以看看,主要就是界面展示,如果想要做到动态的日历,需要对模型动态的增删,这个功能后续我们在完善。
 1 import QtQuick 2.6
 2 import QtQuick.Window 2.0
 3 import QtGraphicalEffects 1.0
 4
 5 import "../contrl"
 6
 7 Window
 8 {
 9     visible: true;
10     width: 300;
11     height: 300;
12
13     Rectangle
14     {
15         id:root;
16         anchors.fill: parent;
17         width: root.width;
18         height: root.height;
19         color: "yellow";
20
21         //日期头
22         Row
23         {
24             id: weekname;
25             spacing: 2;
26             padding: 5;
27
28             Repeater
29             {
30                 model: ["周天", "周一", "周二", "周三", "周四", "周五", "周六"]
31                 Rectangle
32                 {
33                     width: (root.width - 6 * weekname.spacing - 10) / 7;
34                     height: 30
35                     radius: 3
36                     color: "lightBlue"
37                     Text
38                     {
39                         anchors.centerIn: parent
40                         text: modelData
41                     }
42                 }
43             }
44         }
45
46         //天
47         GridView
48         {
49             id: weekday;
50             boundsBehavior: Flickable.StopAtBounds;
51             anchors//布局
52             {
53                 top: weekname.bottom;
54                 left:root.left;
55                 leftMargin:5;
56                 right: root.right;
57                 rightMargin:5;
58                 bottom: root.bottom;
59             }
60             model: 42;//天数
61
62             cellWidth: (root.width - 10) / 7;
63             cellHeight: (root.width - 10) / 7;
64 //            Repeater
65 //            {
66 //                Rectangle
67 //                {
68 //                    radius: 8;
69 //                    color: "lightBlue";
70 //                    Text
71 //                    {
72 //                        anchors.centerIn: parent;
73 //                        text: modelData;
74 //                    }
75 //                }
76 //            }
77             delegate: numberDelegate;
78             focus: true;//可以获取焦点
79         }
80
81         Component//绘制代理
82         {
83             id: numberDelegate;
84             Rectangle
85             {
86                 width: weekday.cellWidth;
87                 height: weekday.cellHeight;
88                 color: GridView.isCurrentItem ? "green" : "lightGreen"//根据是否是当前项设置颜色
89                 border.color: Qt.lighter("green");
90                 Text
91                 {
92                     anchors.centerIn: parent;
93                     font.pixelSize: 10;
94                     text: index + 1;//文本取索引值
95                 }
96             }
97         }
98     }
99 }
补充:示例代码中:GridView中的repeater元素是不需要的,repeater是配合定位器使用的模型,因为每一个repeater都包含一个默认的绘制代理。
注:这是qml学习系列的第一篇文章,后边我还会以这种示例的形式继续更新更多学习的进度,希望大家多多支持,有问题的小伙伴可以私信我。谢谢。。。